
Wedding planning involves so many moving pieces. By the time your wedding day gets close, important details can be scattered everywhere—vendor emails, screenshots, contracts, your Notes app, Canva designs, text messages, and spreadsheets.
That’s where a wedding day binder comes in.
A wedding day binder gives you one organized place for the information you, your wedding party, family, and vendors may need when the big day finally arrives. Instead of trying to remember where you saved the photographer’s schedule or who has the final ceremony seating layout, you already know exactly where to find it.
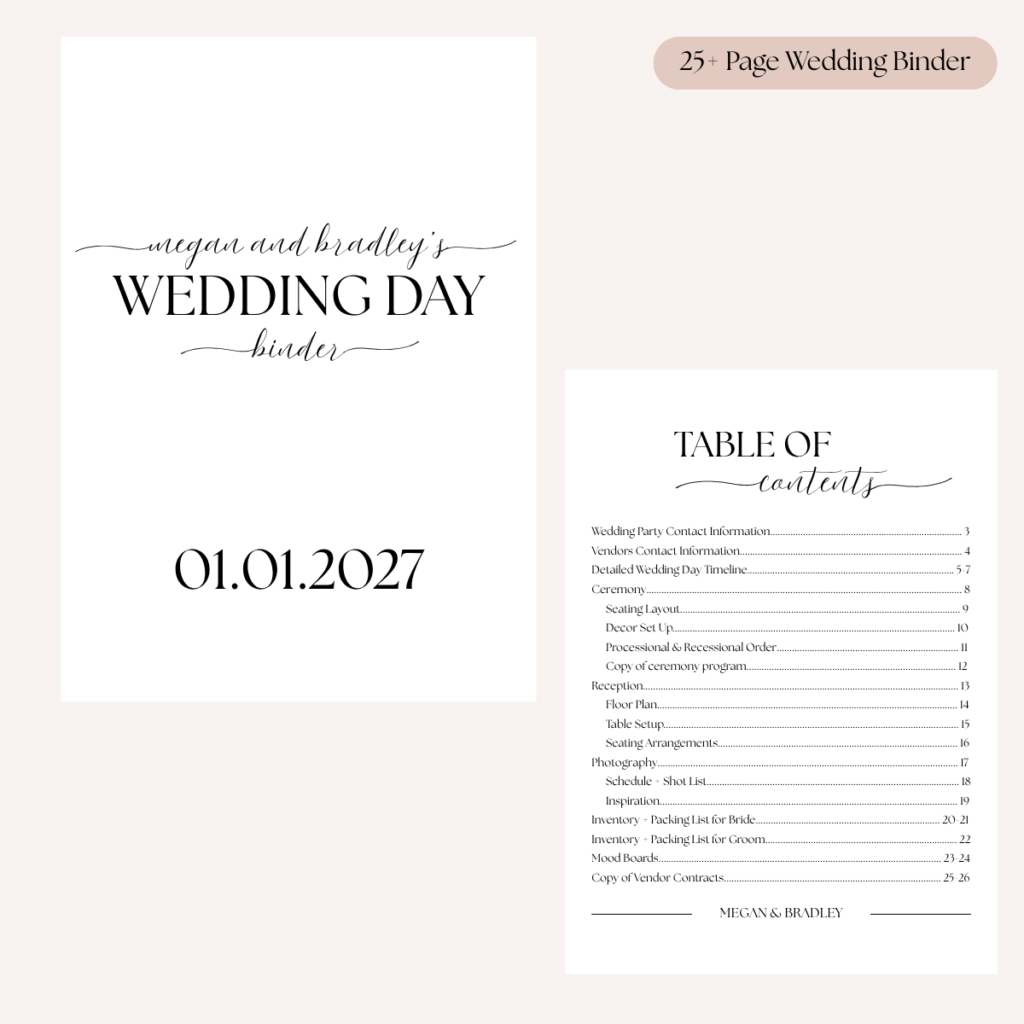
As I plan my own wedding, I’ve realized there’s a big difference between planning a wedding and organizing everything you’ve planned for the actual wedding day. That’s why I created my 26-page Editable Wedding Day Binder Template.
Here’s what I recommend including in yours.
1. Wedding Party Contact Information
Start with a simple contact sheet for the people who may need to communicate with one another throughout the day.
Include names, phone numbers, roles, and any other information that might be helpful.
This becomes especially useful when someone needs an answer while you’re getting your hair done, taking photos, or simply trying to enjoy your wedding.
Tip: Make sure at least one trusted person has access to these contacts besides you.
2. Vendor Contact Information
Your wedding binder should also have one easy-to-find list of your vendors.
Include your venue, photographer, videographer, florist, DJ or band, caterer, hair and makeup artists, transportation, bakery, rental company, and any other vendors involved in your day.
Add the best contact number for each vendor so no one has to dig through months of emails to find it.
3. A Detailed Wedding Day Timeline
If there is one thing I wouldn’t skip, it’s this.
Your wedding-day timeline can include everything from hair and makeup through the end of your reception.
Think about:
- Hair and makeup
- Getting-ready photos
- First look
- Wedding-party photos
- Family photos
- Transportation
- Ceremony
- Cocktail hour
- Reception entrance
- Dinner
- Speeches
- First dances
- Cake cutting
- Open dancing
- Last call
- Grand exit
The more people involved in your wedding, the more valuable a clear timeline becomes.
And don’t keep the timeline to yourself! Give the people who actually need it access to it before your wedding day.
4. Ceremony Details
There are a surprising number of little decisions that go into a ceremony.
I recommend keeping your seating layout, décor setup, processional and recessional order, and ceremony program together.
Your processional order is especially worth writing down. When everyone is excited and getting lined up before the ceremony, you don’t want to rely on someone remembering the exact order you discussed weeks ago.
Your décor setup page can also document where signs, florals, candles, reserved-seat markers, programs, and other ceremony details belong.
5. Reception Floor Plan
Add a copy of your final reception floor plan to your binder.
This can show where your guest tables, head or sweetheart table, dance floor, DJ or band, bar, cake table, gift table, and other important areas should be located.
Even if your venue already has this information, I like having your own copy with the rest of your wedding details.
6. Table Setup + Seating Arrangements
Your reception setup deserves its own section too.
Keep a copy of your final seating arrangements and document how you want the tables to look.
This is a great place to include details about linens, centerpieces, candles, table numbers, menus, place cards, favors, and any other elements you’ve chosen.
You’ve spent months making these decisions. Your wedding day isn’t the time to try to remember them all.
7. Photography Schedule + Must-Have Shot List
Your photographer will likely help create a photography timeline, but I still recommend keeping a copy in your wedding binder.
I also love having a must-have photo list.
You don’t need to list every obvious photo your photographer already knows to take. Instead, focus on specific combinations or moments that matter to you.
For example, you might want a photo with your siblings, grandparents, college friends, extended family, or a particular group that your photographer wouldn’t automatically know is important.
Having those combinations written down can make family photos much easier to organize.
8. Photography Inspiration
Pinterest boards and saved TikToks are great, but I also like the idea of creating a small photography inspiration page.
Add a few images that communicate the overall feeling you’re drawn to rather than trying to recreate dozens of exact poses.
This can give you a visual reference for the types of detail shots, bridal portraits, wedding-party photos, or candid moments you love.
9. Bride’s Wedding Day Packing List
This might be one of my favorite sections because there are so many little things that need to make it to the bridal suite.
Beyond the obvious dress and shoes, think about items like your jewelry, veil, perfume, vows, invitation suite, rings, touch-up makeup, comfortable shoes, phone charger, steamer, and other getting-ready essentials.
I recommend creating your list well before wedding week and checking things off as you pack.
10. Groom + Groomsmen Packing List
Don’t forget the groom’s side!
The groom’s list might include his suit or tuxedo, dress shirt, shoes, socks, belt or suspenders, tie or bow tie, cufflinks, watch, vows, cologne, and any other personal details.
Having separate bride and groom lists makes it much easier to confirm that everything made it to the right getting-ready location.
11. Wedding Mood Boards
Mood boards aren’t just for the beginning of wedding planning.
Keeping your final visual inspiration together can be helpful when you’re communicating the look you’ve planned for different parts of the day.
You might create separate inspiration boards for your ceremony, reception, florals, tables, signage, or photography.
12. Copies of Important Vendor Contracts
Finally, keep your important vendor information and contracts somewhere accessible.
You probably won’t need them on your wedding day—and hopefully you don’t!—but I would rather have important documents organized and not need them than be searching through my email if a question comes up.
The Wedding Binder I Created to Organize It All
Once I started thinking about everything that needs to come together on the actual wedding day, I wanted something different from a traditional wedding planner.
I didn’t need another place to tell me what month to order invitations or how to create a wedding budget.
I wanted somewhere to put the final details.
So I created my 26-page Editable Wedding Day Binder Template to organize the information you’ll actually want accessible as your wedding gets closer.
Inside, I’ve included pages for:
- Wedding party + vendor contacts
- A detailed wedding-day timeline
- Ceremony details
- Seating layout
- Décor setup
- Processional + recessional order
- Ceremony program
- Reception details
- Floor plan
- Table setup
- Seating arrangements
- Photography schedule + shot list
- Photography inspiration
- Bride inventory + packing list
- Groom inventory + packing list
- Wedding mood boards
- Vendor contracts
Everything is organized into one clean, timeless binder that you can personalize with your own wedding information.
→ Shop the Editable Wedding Day Binder Template
Why I Recommend Making Your Binder Before Wedding Week
Don’t wait until the week of your wedding to start gathering this information.
Create your binder while you’re finalizing details. Then, as vendors confirm timelines, seating gets finalized, and plans change, you can update everything along the way.
By wedding week, you’re not starting another project.
You’re simply checking that your binder is complete.
And when someone asks, “What time is the photographer arriving?” or “Where is this décor supposed to go?”, the answer doesn’t have to live entirely in your head.
That’s really the point of a wedding day binder.
You’ve already done the planning. Now give all those plans a place to live.
Leave a Reply